Marbled Art Stars
Posted by DecoArt on Dec 21st 2022
December 21, 2022
Marbled Art Stars
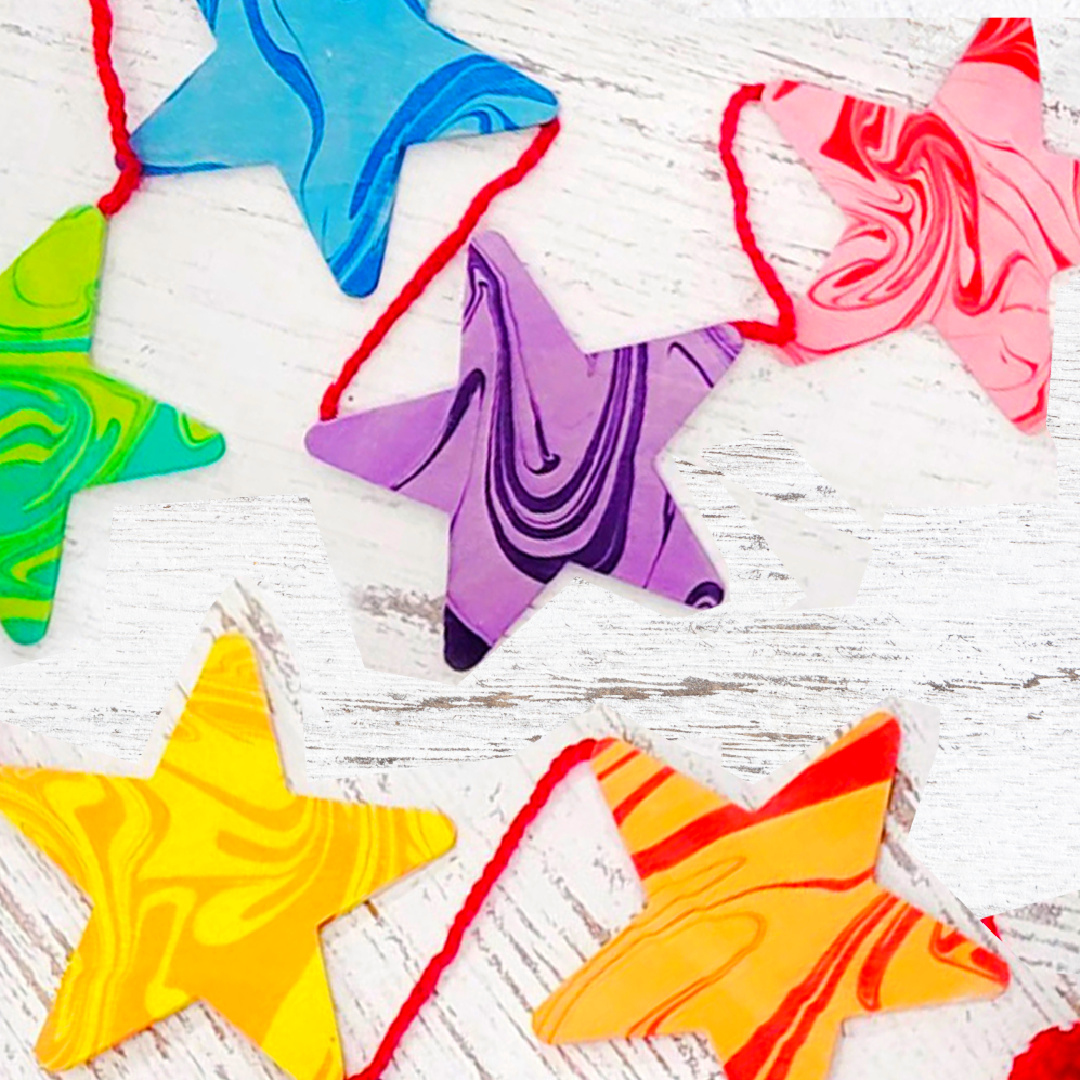
Make a cute rainbow star banner to add a pop of marbled color to any space!
With DecoArt's Water Marbling Acrylic Paints, all of the guess work and mixing has been taken care of with no worries of harsh odors or chemicals to deal with. You can use the paints directly out of the bottle to experiment and create beautiful patterns on a variety of materials! DecoArt also has eductional videos for work space set up and water marbling techniques as well as historical/ traditional references to help you get started on your artisitic journey using water marbling paints.
Water Marbled Wooden Star Banner
Level: Easy-Intermediate
Step 1
Follow directions to mix up size using the Magic Medium. The Magic Medium thickens the water so the water marbling paints will float on top, allowing you to pull a print. Set up the rest of your area for water marbling. Make sure to have all of your materials easily accessible.
Check out this link for some great tips for an efficient set up.
https://www.youtube.com/watch?v=6TBp8iRkwWQ
TIP: Have a garbage can handy for discarding used cleaning papers.
Need to see it in action?
Watch the full project marbling demo before you begin!
Step 2
Begin your first color design by creating a base color with Yellow Water Marbling Arcylic. Pour a line down the center of the tray. Pour an additonal yellow line down the center and then drop some paint randomly over the surface (these circles are called "stones"). Next, drop stones of Yellow Green paint randomly over surface. Using the Specialty Water Marbling Stick tip, pull throught the surface of the paint and create a swirled design. Starting with one side, submerge a wooden star into the size completely and pull out. Drain off excess size and dab the edges with a paper towel to absorb extra size. Lay on a non-stick surface, like freezer paper, to allow to dry completely.
TIP: There will be paint left on the surface of the size. Why not make a print on DecoArt's Water Marbling Paper? That way you are not wasting paint and you already have printed marbled paper for crafting and artwork!
Step 3
After pulling the print with the Premium Water Marbling Paper, clean off the surface with the Water Marbling Cleaning Paper. Once clean, pour a line of Yellow Water Marbling Arcylic. After the paint disperses, pour second yellow line down the center of the tray. Drop some stones of yellow paint randomly over the surface. Next, drop stones of Orange paint randomly over surface. Using the Specialty Water Marbling Stick tip, pull throught the surface of the paint to create a swirled design. Submerge a wooden star, at an angle, into the size completely and pull out. Drain off excess size and dab the edges with a paper towel to absorb extra size. Lay on a non-stick surface, like freezer paper, to allow to dry completely.
TIP: There will be paint left on the surface of the size. Why not make a print on DecoArt's Water Marbling Paper? That way you are not wasting paint and you already have printed marbled paper for crafting and artwork!
TIP: You will begin to see some drops of paint on the bottom of the tray, this will not effect your prints as long as you clean off the surface where the paint floats.
Step 4
After pulling the print with the Premium Water Marbling Paper, clean off the surface with the Water Marbling Cleaning Paper. Once clean, pour a line of Orange Water Marbling Arcylic. After the paint disperses, pour second orange line down the center of the tray, as well as some Orange stones. Drop some stones of Red paint randomly over the surface. Using the Specialty Water Marbling Stick tip, pull throught the surface of the paint to create a swirled design. Submerge a wooden star, at an angle, into the size completely and pull out. Drain off excess size and dab the edges with a paper towel to absorb extra size. Lay on a non-stick surface, like freezer paper, to allow to dry completely.
TIP: There will be paint left on the surface of the size. Why not make a print on DecoArt's Water Marbling Paper? That way you are not wasting paint and you already have printed marbled paper for crafting and artwork! Make sure to clean off the rest of the excess paint from the surface using the cleaning paper before beginning a new design
Step 5
After pulling the print with the Premium Water Marbling Paper, clean off the surface with the Water Marbling Cleaning Paper. Once clean, pour a line of Pink Water Marbling Arcylic. After the paint disperses, pour second Pink line down the center of the tray, as well as some Pink stones. Drop some stones of Red paint randomly over the surface. Using the Specialty Water Marbling Stick tip, pull throught the surface of the paint to create a swirled design. Submerge a wooden star, at an angle, into the size completely and pull out. Drain off excess size and dab the edges with a paper towel to absorb extra size. Lay on a non-stick surface, like freezer paper, to allow to dry completely.
TIP: There will be paint left on the surface of the size. Why not make a print on DecoArt's Water Marbling Paper? That way you are not wasting paint and you already have printed marbled paper for crafting and artwork! Make sure to clean off the rest of the excess paint from the surface using the cleaning paper before beginning a new design
Step 6
After pulling the print with the Premium Water Marbling Paper, clean off the surface with the Water Marbling Cleaning Paper. Once clean, pour a line of Lavender Water Marbling Arcylic. After the paint disperses, pour second Lavender line down the center of the tray, as well as some Lavender stones. Drop some stones of Violet paint randomly over the surface. Using the Specialty Water Marbling Stick tip, pull throught the surface of the paint to create a swirled design. Submerge a wooden star, at an angle, into the size completely and pull out. Drain off excess size and dab the edges with a paper towel to absorb extra size. Lay on a non-stick surface, like freezer paper, to allow to dry completely.
TIP: There will be paint left on the surface of the size. Why not make a print on DecoArt's Water Marbling Paper? That way you are not wasting paint and you already have printed marbled paper for crafting and artwork! Make sure to clean off the rest of the excess paint from the surface using the cleaning paper before beginning a new design
Step 7
After pulling the print with the Premium Water Marbling Paper, clean off the surface with the Water Marbling Cleaning Paper. Once clean, pour a line of Light Blue Water Marbling Arcylic. After the paint disperses, pour second Light Blue line down the center of the tray, as well as some stones. Drop some stones of Blue paint randomly over the surface. Using the Specialty Water Marbling Stick tip, pull throught the surface of the paint to create a swirled design. Submerge a wooden star, at an angle, into the size completely and pull out. Drain off excess size and dab the edges with a paper towel to absorb extra size. Lay on a non-stick surface, like freezer paper, to allow to dry completely.
TIP: There will be paint left on the surface of the size. Why not make a print on DecoArt's Water Marbling Paper? That way you are not wasting paint and you already have printed marbled paper for crafting and artwork! Make sure to clean off the rest of the excess paint from the surface using the cleaning paper before beginning a new design
Step 8
After pulling the print with the Premium Water Marbling Paper, clean off the surface with the Water Marbling Cleaning Paper. Once clean, pour a line of Yellow Green Water Marbling Arcylic. After the paint disperses, pour second Yellow Green line down the center of the tray, as well as some stones. Drop some stones of Green paint randomly over the surface. Using the Specialty Water Marbling Stick tip, pull throught the surface of the paint to create a swirled design. Submerge a wooden star, at an angle, into the size completely and pull out. Drain off excess size and dab the edges with a paper towel to absorb extra size. Lay on a non-stick surface, like freezer paper, to allow to dry completely.
TIP: There will be paint left on the surface of the size. Why not make a print on DecoArt's Water Marbling Paper? That way you are not wasting paint and you already have printed marbled paper for crafting and artwork! Make sure to clean off the rest of the excess paint from the surface using the cleaning paper before beginning a new design
Step 9
Mark a straight line on the back of each star with a ruler. This will keep your glue lines even.
Step 10
Pour a line of hot glue on the marked line. Pull your yarn taught and place into the glue and allow to cool.
Step 11
Measure around 4" between stars and reapeat the process.
TIP: Get some cute embellishments to add to the banner, like pom poms or tassels.
Optional: Step 12
Paint stars with a Satin or Gloss DuraClear Varnish using a flat brush. Allow to dry.
Hang this banner in a kid's room or as a reusable party decoration.
Modify the color mixture and even wooden shapes to personalize!